In this post I describe what the n + 1 problem is, how it relates to graphene-sqlalchemy, I describe some possible solutions and finally I’ll describe the solution I created for a project that uses graphene-sqlalchemy for my current employer (NRC Media B.V.).
I’ve released version 0.6.1 of pelican-albums (my image album and thumbnail plugin for pelican). This release brings a single change:
- Add support for pelican 4.0.0.
I recently ran across a problem where one of the Scaleway servers I rent no longer booted because it could not mount /dev/nbd1 after a reboot:
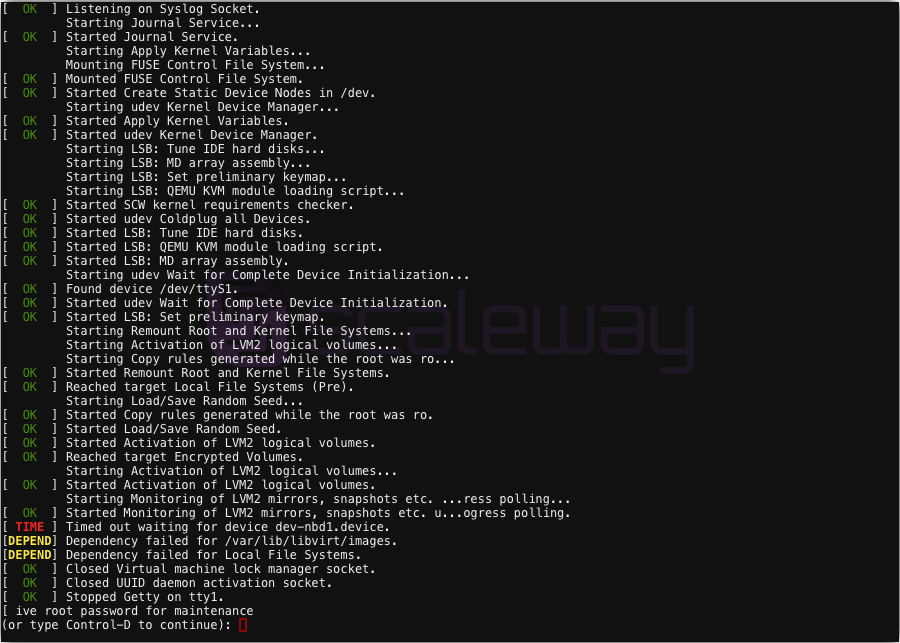
The canonical solution to problems like these in the age of the cloud is to delete the machine and to provision a new …
For a new project, I needed wxPython. Now, wxPython is notoriuous for being a pain to install inside a virtual environment on OSX. And if you do get wxPython installed in a virtual environment, you’ll notice the following error message when creating a wx.App instance:
This program needs …The context of this rant is a conversation with Tracy Osborn on the importpython blog.
On the surface, the linked article tells an endearing tale about a woman whom, after several setbacks, one of them related to the schism between web design and programming, manages to launch a successful startup …
Recently, I’ve been working on a new project. It’s called Pelicide and it’s an IDE for sites built with the Pelican Static Site Generator. It consists of a web service which is written in python and uses the twisted framework which serves the main web interface, an …
I’ve released version 0.6.0 of pelican-albums (my image album and thumbnail plugin for pelican). This release brings two new features:
- Setting the output quality of JPEG thumbnails.
- Allow changing the output format of thumbnails to PNG.
In this article, I describe my current set up for writing content for my pelican based sites on my phone.
In this article I describe a way to share a pelican install between multiple authors using a workflow which involves GitHub and an automated server-side build system.
I’ve released version 0.5.1 of pelican-albums (my image album and thumbnail plugin for pelican). The most significant change (apart from some documentation improvements) is that it now automatically excludes documents inside the album path from becoming articles or pages.
Get it now:
pip install -U pelican-albums- pelican-albums …
Page 1 / 3 »